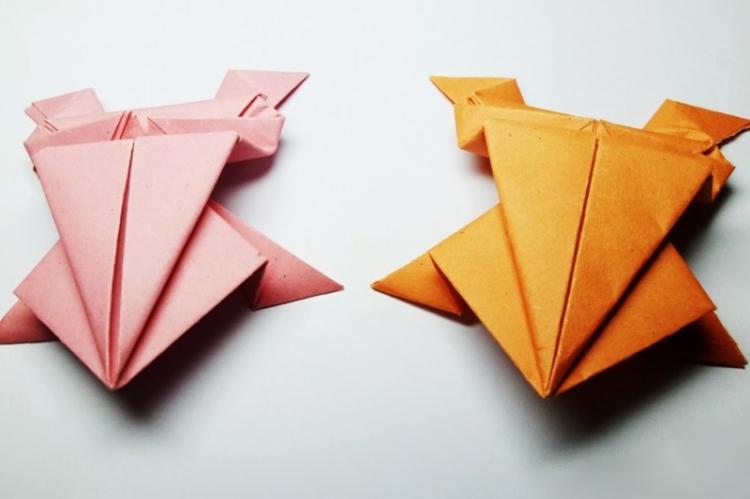
A lot of interesting and unusual toys can be made from an ordinary sheet of paper. Today we will tell you how to make a cute and neat frog, and far from one. Here you can find jumping, voluminous, and modular ... As you will see, this hobby perfectly relaxes, and also makes children very happy!
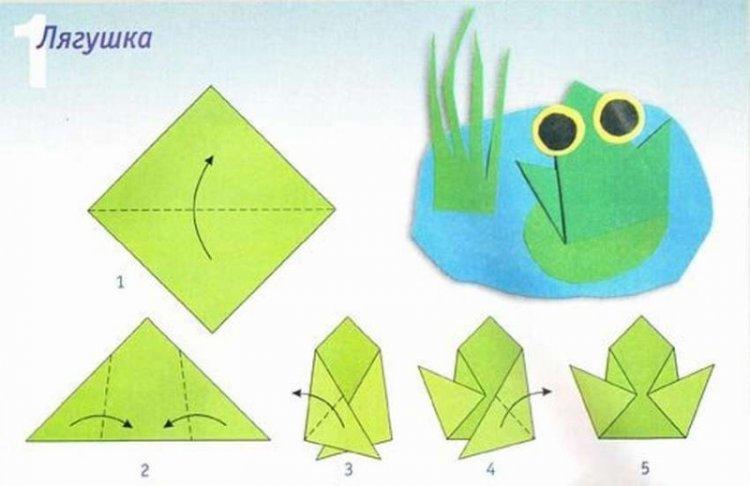
1. Simple frog for applique
The simplest paper frog for panels and appliques is done in just a few movements. Fold the green square in half, tuck the corners of the base towards the middle so that they move slightly from each other. To form the legs, turn them in the opposite direction. Place the frog in a pond, stick eyes and plant reeds and water lilies around.
2. A4 paper frog
Take a green A4 sheet of paper, visually limit the top square and mark along the diagonal and middle horizontal. Fold the entire sheet vertically and unfold to mark this line more. Form a triangle from the top, bending inward to the sides.
Fold up the corners of the top layer to form a diamond, and fold the edges of the "house" towards the center. Bend the elongated figure in half and fold another half of the square back. Turn the frog over, spread its legs, and draw or glue the eyes.
3. Classic paper frog
Mark the middle and diagonals of the green square, and form an isosceles triangle by bending the sides inward. Bend the bottom corners at the base of the top layer up, and then bend them again. Fold down the top of the triangle and flip the piece over to the other side.
Tuck the sides so that they overlap a little, and bend the long part in the opposite direction. Fold the elongated figure back and forth with an accordion, and to give the frog volume, turn it over again and draw the eyes.
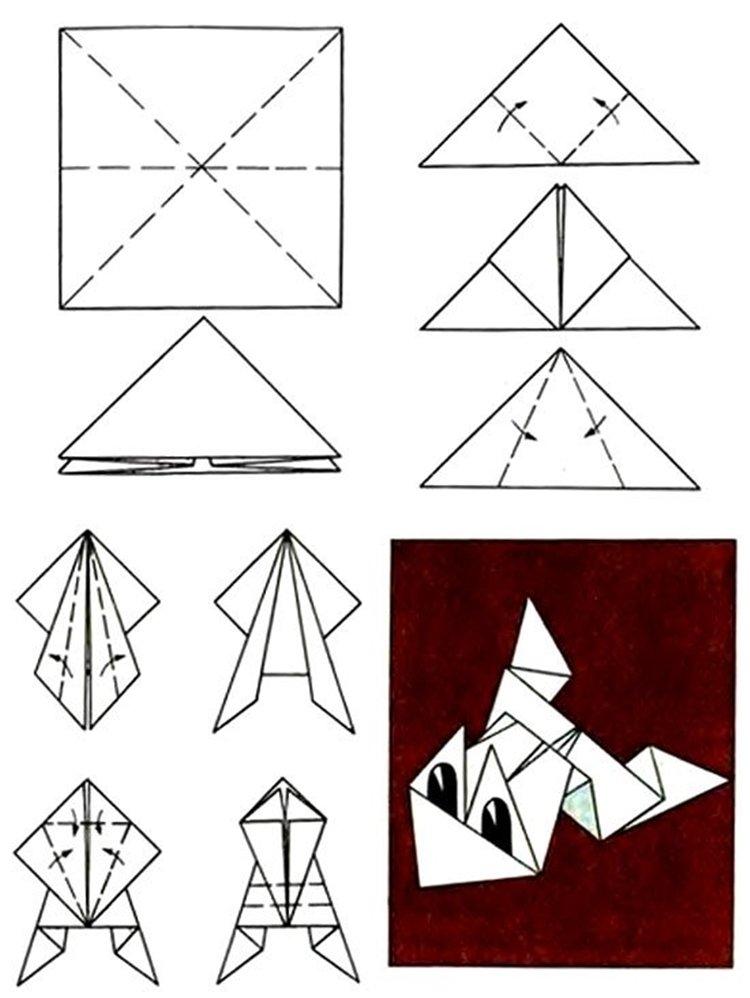
4. Frog made of triangles
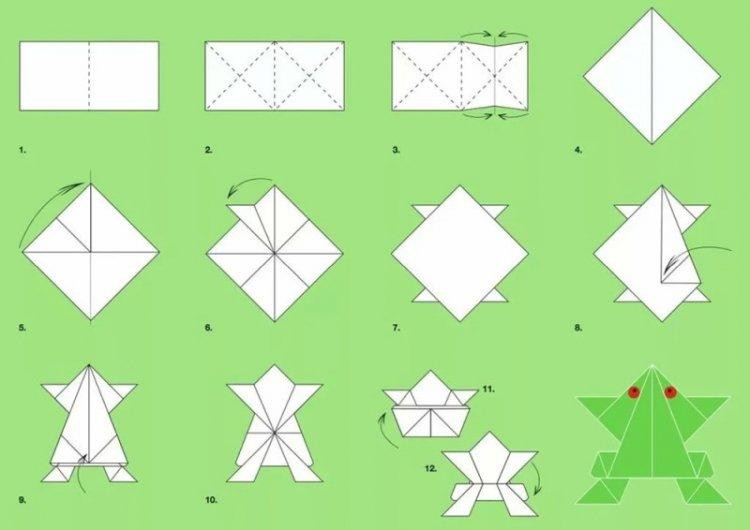
Fold the square in half, mark the center of the rectangle and the diagonals of its sides. Spread the left and right halves of the paper into triangles, so that as a result you get a voluminous multilayer rhombus. Bend the corners from the middle above and below, as in the diagram - these will be the frog's legs.
Turn the part over, bend the sides of the rhombus to the center, and hide the bottom corner inward. Turn the frog over again and make a voluminous "accordion" from the side of the hind legs. On the head, draw eyes or glue ready for crafts.
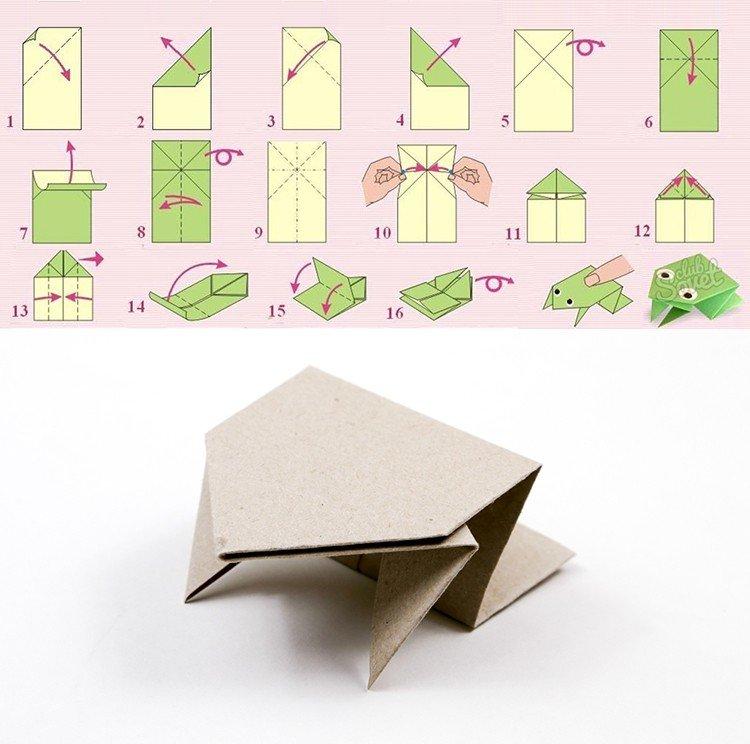
5. Jumping paper frog
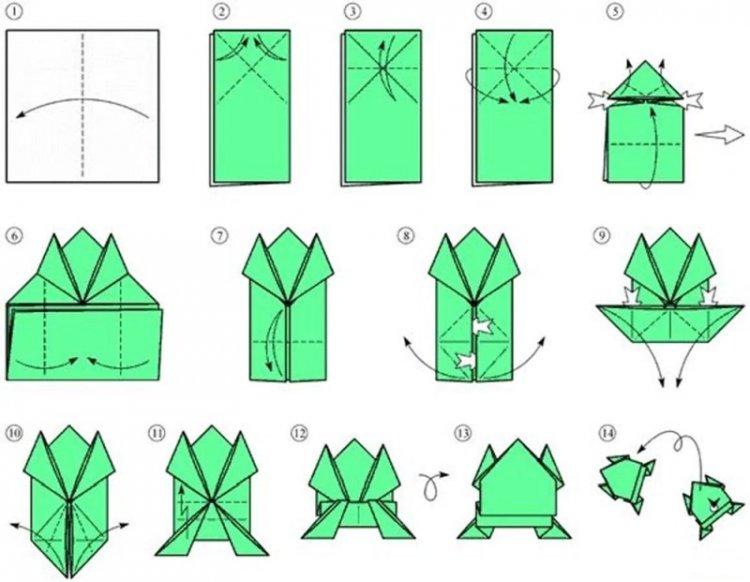
Fold a square of paper in half into a rectangle and use folds to mark its top diagonally and in the middle. Form a triangle out of it, wrapping the sides inward, and bend the corners of its base upwards into a "tulip". Fold to the middle of the side of the main trapezoid, mark its horizontal and extend the corners into an inverted trapezoid.
Assemble a square from a trapezoid, and turn its lower corners back and unfold the sides into triangles, as in the diagram. Then bend the lower legs by analogy with the upper ones and make a small "accordion" below for volume. Turn the frog over and gently press in the middle on the fold with your finger - this is how it jumps.
6. Volumetric origami frog
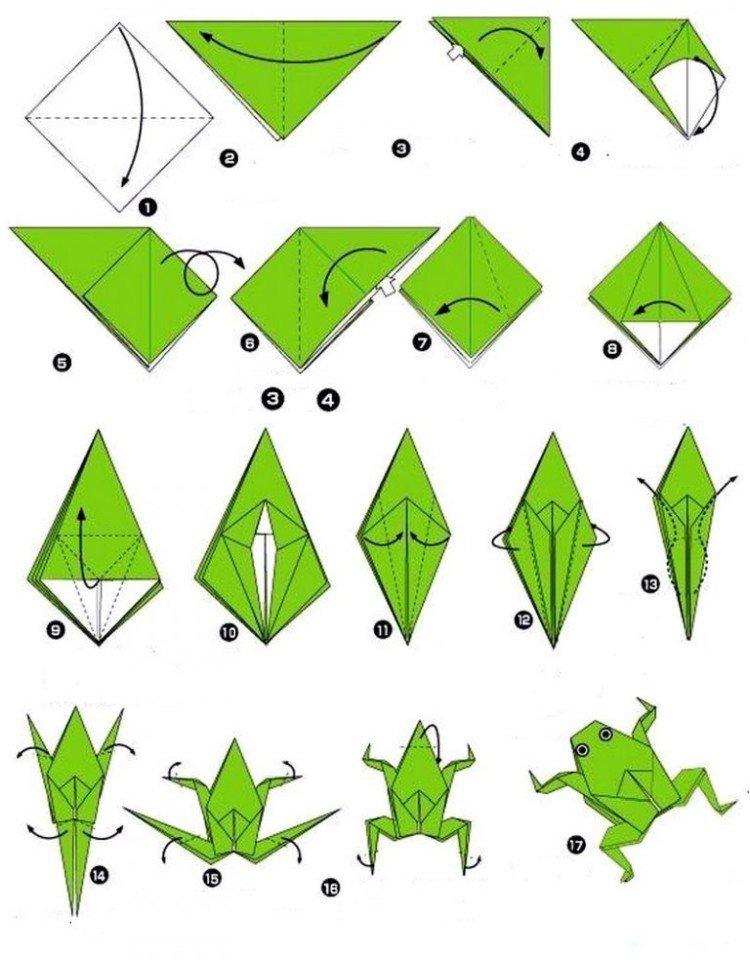
Fold a sheet of paper diagonally into a rectangular, multi-layered triangle. Spread the top layer in a diamond to the side, turn the piece over and do the same. Place the diamond with the "book" down and bend the sides of the top layer towards the middle, and do the same with the others, but do not overlap them.
Lay out the upper elongated rhombus along the fold, as in the diagram, and repeat for the rest of the parts. Fold, fold and form the thin corners from above into the hind legs of the frog, and tuck the inner ones up and shape into the front legs. Fold the top corner inward to make the head, and flatten and inflate the figurine.
7. Children's volumetric frog
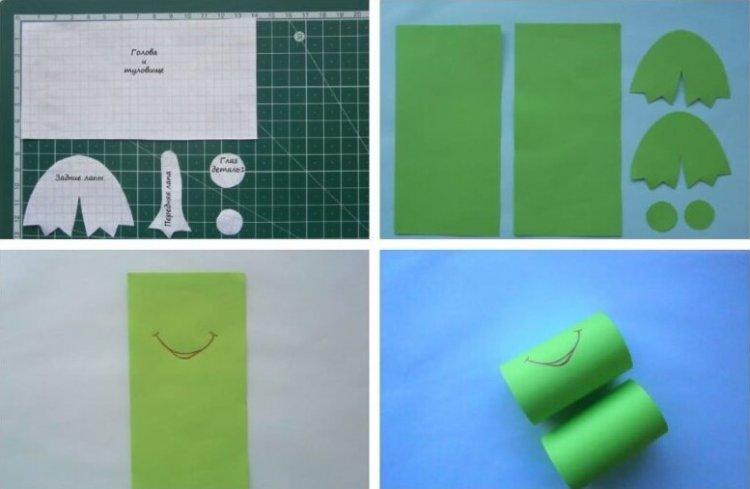
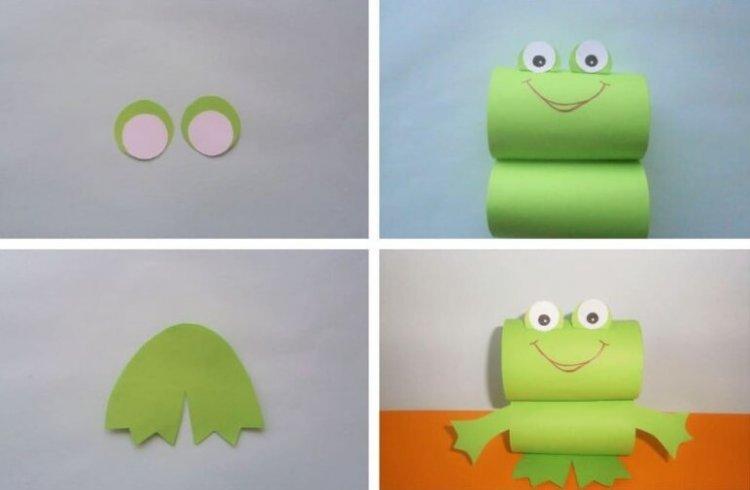
She will need thick double-sided cardboard - green for the body and red for the tongue.Draw the details-legs, as in the picture, keeping the proportions, and for the head and body of the frog, cut out two identical rectangles. Fold the rectangles into cylinders, glue together and glue the legs.
The lower support legs can be folded in several layers to make them thicker and more stable. Make the eyes, draw a mouth with a pen or felt-tip pen, and cut out the tongue from a piece of red cardboard.
8. "Talking" origami frog
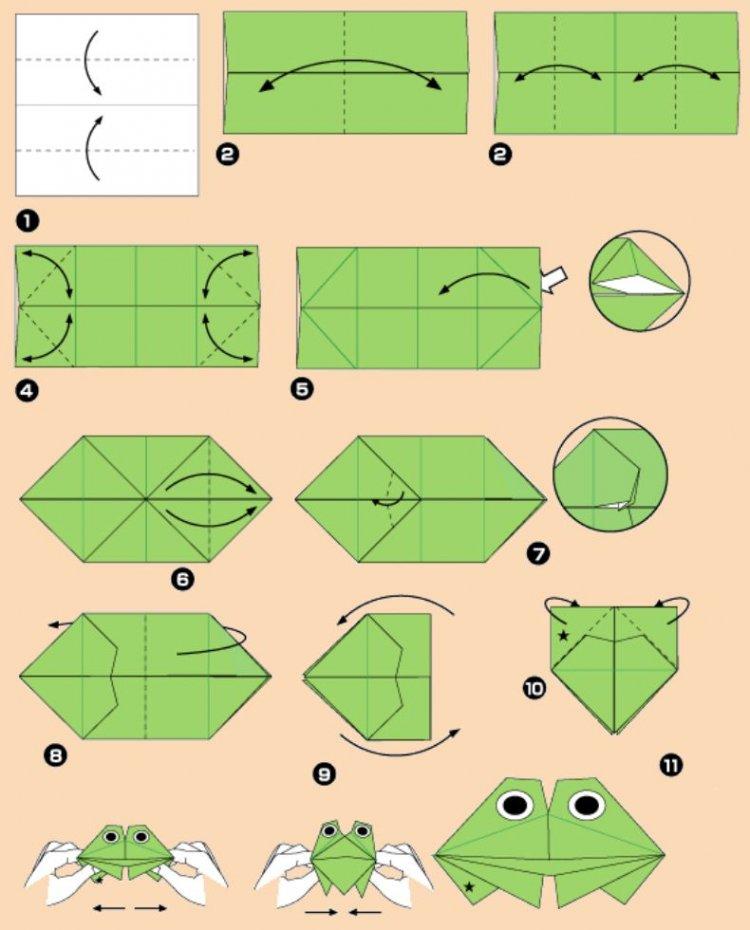
Divide a square piece of paper into four parts horizontally and vertically, and leave the bottom and top curved towards the center. Bend the corners of the rectangle and straighten each into a separate triangle. On one side, make two inner folds, as in the diagram, fold the part in half and unfold the top of the triangle down. Bend the upper corners back, squeeze and stretch the figure - and you get a frog that opens its mouth.
9. Glued frog
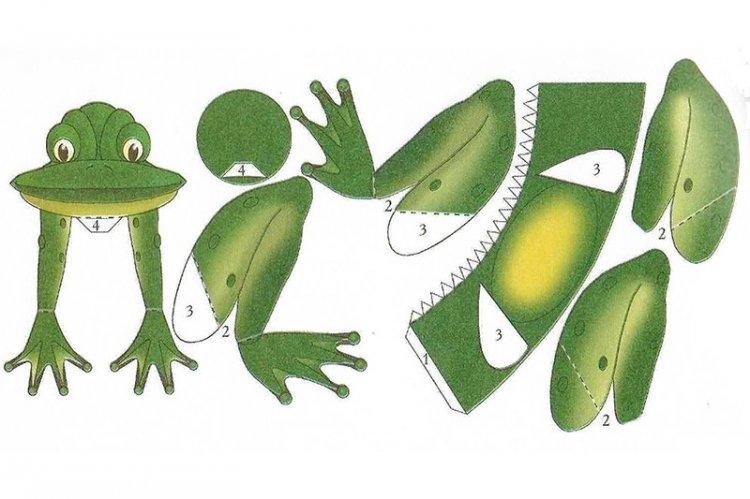
If you don't like origami or plan to teach your child how to use scissors and glue, then a charming paper frog can always be made from several parts. Transfer the template to paper, cut out and be sure to leave folds and triangles to glue. Color in all the pieces and assemble the shape according to the numbers indicated in the template in the same order.
10. Modular paper frog
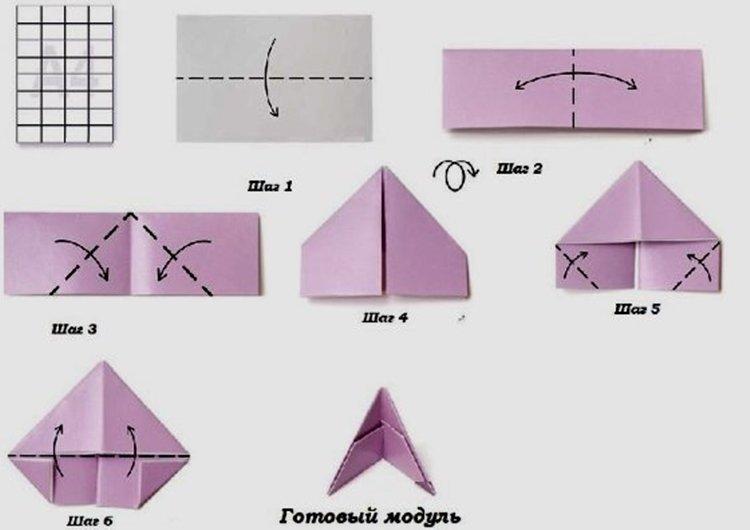
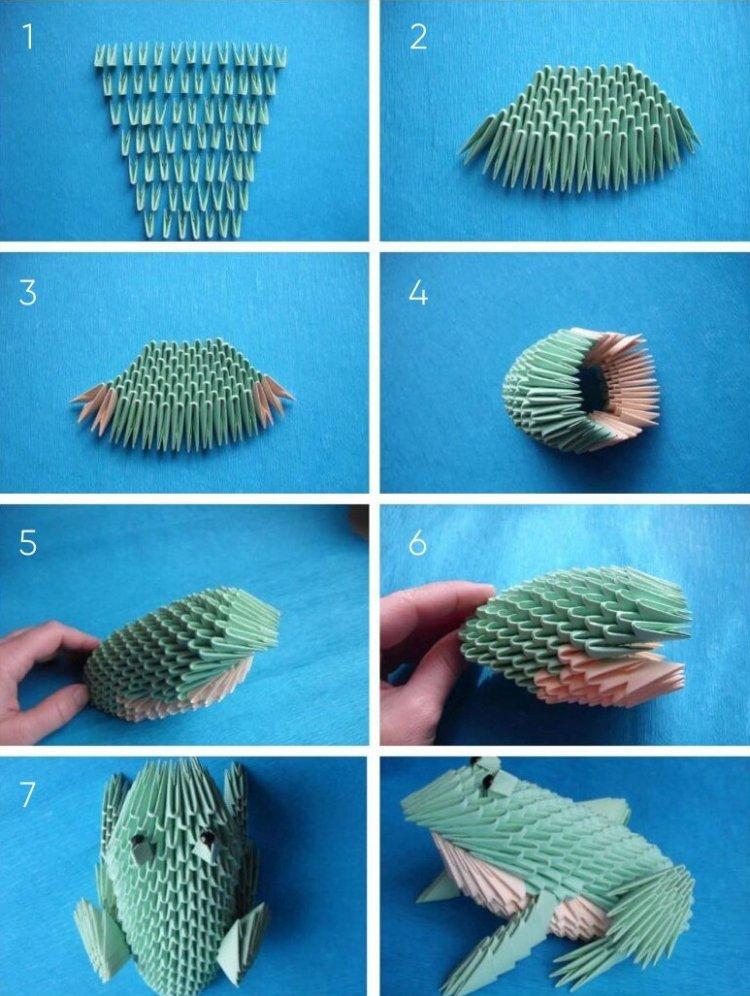
Modular origami is a very painstaking technique, but the frog will also come out unusual and interesting. You will need as many as 350 green and 95 white modules. Roll them up according to the figure with the expectation that about 30 pieces should turn out from a sheet of colored paper. Better to do a little more with a margin, in case you go wrong somewhere.
Fold the rectangular piece in half and fold the edges towards the center to assemble the house. Fold up the bottom corners, tuck the resulting trapezoid and fold the triangle in half. Glue the future paper frog step by step from small parts according to the pictures.
